
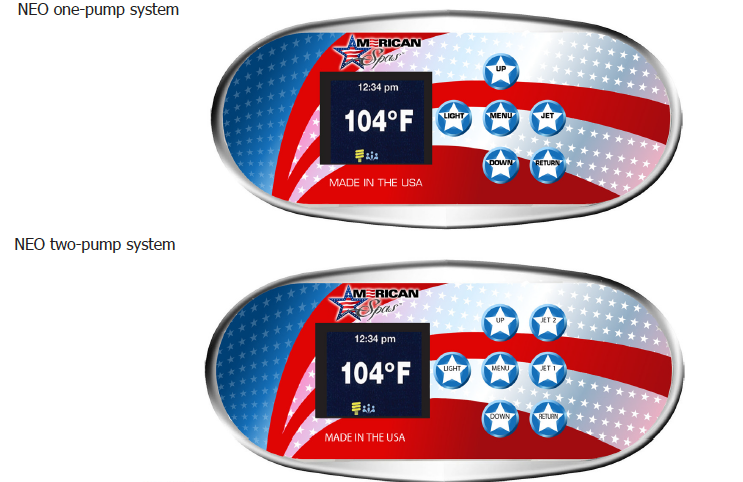
Congratulations on your purchase of an American Spa Hot tub, we are just as excited to get you in your hot tub. At this point we are sure your thinking, How do I turn on my hot tub? Well if your hot tub is a Neo control panel like the one pictured below we have got you covered. Take a moment to read this manual carefully to understand how to use or decipher your hot tubs top side. Following the instructions in this manual will ensure the safe and smooth operation of your new spa. Here we will review hot tub operation from initial start up to the meaning of the various codes that can be displayed on your control panel for a one pump and a two pump system. If you have additional questions please give us a call (909) 623-8781 EXT. 312 we are open 9:00 am to 3:00 pm Pacific time.
Main Screen
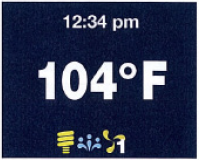
The main screen displays current time, water temperature, and status of the system accessories. the screen below from bottom to left to right indicates LIGHT ON, BLOWER ON, JET 1 at low speed.
Primping Mode:
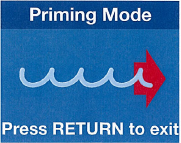
When power is on , the system will enter a priming mode with priming screen display on the panel. In this mode, all devices such as JETS, BLOWERS or LIGHT are operable. JETS can be Turned on and off to the prime the pump when RETURN button is pushed, or after 4 minutes of inactivity.
Spa Operation
Turn System Accessories ON and OFF by pushing appropriate button on the right side of the panel (LIGHT, JET1, BLOWER, JET2…) These accessories have time out defaults from the manufacturer and will turn OFF automatically after the time had expired.
Menu Navigating
- MENU button: use to enter setting menu and sub-menu screens. For the screens with several settable fields ( example: DATE-TIME screen), use MENU button to navigate between different fields within the screen.
- UP and DOWN button: use to navigate between different options or changing values of a field.
- RETURN button: use to navigate between different options or changing values of a field.
Setting Temperature

To change water set temperature, use UP and DOWN buttons to set the desired temperature. The screen will display “SET TEMP” with the current set temperature. After 5 seconds without any change to the set temperature, the screen will reverse back to MAIN screen with current water temperature display. Changing set temperature to determine if water needs to needs heated up.
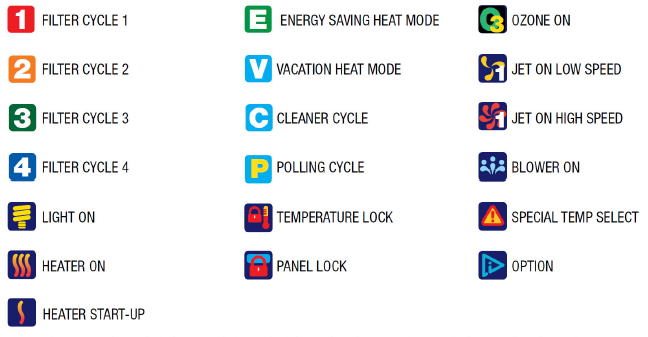
Selection Icons:
Panel timeout:
If User is in setting Menus and no button is pushed within 15 seconds, the screen will timeout, current screen setting will be lost and panel reverts back to main screen. In MAIN screen, if no buttons is pushed within 60 minutes, all LED and LCD lights will turn off and panel goes to sleep, any button pushed in this time will wake the panel up, LED and LCD lights will turn back on the panel will poll for water temperature.
Enter setting screens:
- Press MENU button to display a list of the set up screens.
- Use UP and DOWN to navigate between various set up screens.
- Press MENU again to enter particular set up screen or press RETURN to goes back to MAIN screen.
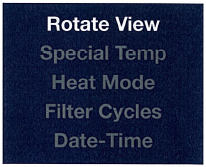
Setting screens:
- ROTATE VIEW: rotate the view 180 degrees, the UP and DOWN buttons also swap when rotated. With ROTATE VIEW highlighted, press MENU to enter ROTATE VIEW setting. Use UP/DOWN to select desired setting and RETURN to exit and confirm the setting.
- SPECIAL TEMP: to temporarily heat spa to 105°F or 106°F once, and return to previous temperature setting. With SPECIAL TEMP highlighted, press MENU to enter SPECIAL TEMP setting. Use UP/DOWN to select the desired setting and RETURN to exit and confirm the setting.
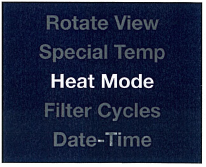
- HEAT MODE: select STANDARD heating mode for most users or ENERGY SAVING mode (reduces polling for water temperature) or VACATION mode (set temp set to 60°F). With HEAT mode highlighted, press MENU to enter HEAT mode setting. Use UP/DOWN to select the desired setting and RETURN to exit and confirm the setting.
- FILTER CYCLES: set up filter cycle START TIME, DURATION and DATE for filtering the spa. For FILTER CYCLE 1 and 2, if DURATION is set to ZERO the system will do a purge cycle at the start time setting. With FILTER CYCLE highlighted, press MENU to enter FILTER CYCLE 1, 2, 3, or 4 setting. Select a FILTER CYCLE and press MENU again to enter TIME/DURATION setting screen. In this screen, press MENU to move between HOURS, MINUTES and DAYS setting; use UP/DOWN to change the values and RETURN to exit and confirm the setting. FILTER CYCLES 3 & 4 default OFF. To select it, enter START TIME, DURATION and enable ALL DAY or specific day for both FILTER CYCLES 3 & 4.
- DATE-TIME: set up date and time for the spa. With DATE-TIME highlighted, press MENU to enter DATE-TIME setting. In this screen, pressing MENU will move and highlight various fields that can change the setting; UP/DOWN to change the values and RETURN to exit and confirm the setting.
- DEGREE F/C: displays spa temperature in Celsius or Fahrenheit. This option is only available for 60 Hz countries. Unit automatically displays Celsius for 50 Hz. With DEGREE F/C highlighted, press MENU to enter DEGREE F/C setting. Use UP/ DOWN to select the desired setting and RETURN to exit and confirm the setting.
- TIME DISPLAY: displays spa time in AM/PM or 24 hours time. With TIME DISPLAY highlighted, press MENU to enter TIME DISPLAY setting. Use UP/DOWN to select the desired setting and RETURN to exit and confirm the setting.
- DEVICES TIMEOUT: allows changes to timeout setting for various devices. LIGHT can be set to a maximum of 4 hours; PUMP in high speed and BLOWER can be set to a maximum of 1 hour; and PUMP in low speed can be set to a maximum of 2 hours. With DEVICES TIMEOUT highlighted, press MENU to enter and select various devices setting. Use UP/DOWN to select the desired time setting and RETURN to exit and confirm the setting.
- PANEL LOCK: provide a choice to select PANEL LOCK for locking all panel buttons except MENU button; use TEMP LOCK to lock UP/DOWN button for changing set temperature; and MENU LOCK to lock MENU button (push and hold MENU button more than 15 seconds to unlock the Menu). With PANEL LOCK highlighted, press MENU to enter PANEL LOCK setting. Use UP/DOWN to select the desired setting and RETURN to exit and confirm the setting.
- NO HEAT TIME: set the time frame for not allowing heater to turn on. With NO HEAT TIME highlighted, press MENU to enter NO HEAT TIME setting. In this screen, pressing MENU will move and highlight various fields that can change the setting; use UP/DOWN to change the values and RETURN to exit and confirm the setting.
- SERVICE MODE: only available far Authorized Dealers and Spa Manufacturer.
- DEMO MODE: to demonstrate all device capabilities of the spa. With DEMO MODE highlighted, press MENU to enter MODE setting. Use UP/DOWN to select the desired setting and RETURN to exit and confirm the setting.
- GENERAL INFORMATION: displays general information for the spa. With GENERAL INFORMATION highlighted, press MENU to enter GENERAL INFORMATION menu. Use UP/DOWN to view different pages and information and RETURN to exit the page. Screen will indicate which plug should be inserted to correct side connector.
- LANGUAGES: to select various languages for the spa display. With LANGUAGES highlighted, press MENU to enter and select a specific language. Use UP/DOWN to select the desired setting and RETURN to exit and confirm the setting.
- SERENITY MODE: set to turn off all outputs and provide quiet while in spa. With SERENITY MODE highlighted, press MENU to enter and select a specific time. Use UP/DOWN to select the desired time setting. Press MENU again to navigate to EXIT/START. Select the desired option and RETURN to exit and confirm the setting.
- ENERGY INTERVAL: only available far Nan-Gire systems. With ENERGY INTERVAL highlighted, press MENU to enter ENERGY INTERVAL setting. Use UP/DOWN to select the desired minutes setting and RETURN to exit and confirm the setting.
- CLEANER CYCLE: only available far Nan-Gire systems. To turn on filtration after using the spa for short cleaning period. With CLEANER CYCLE highlighted, press MENU to enter and select a specific duration. Use UP/DOWN to select the desired time setting. Press Menu again to navigate to Exit/Start. Select the desired option and RETURN to exit and confirm the setting.
- Reset Wi-Fi: only available with Wi-Fi module in the system. To reset Wi-Fi network setting in Wi-Fi module. With RESET Wi-Fi highlighted, press MENU to enter. Use UP/DOWN to select the desired setting and RETURN to exit and confirm the setting.

There you have it! Thank you for joining the American Spas Family, This portion of the blog has been dedicated to the NEO topside on the American spas models. Thinking about owning an American Spa?